Replacing water damaged drywall in your Chalmette home a step by step guide
Water damage in Chalmette requires an immediate and calculated response. Residents near Judge Perez Drive or those living closer to the Mississippi River levees understand that moisture is a constant battle in St. Bernard Parish. When a pipe bursts or a storm surge impacts your property, the gypsum board in your walls acts like a sponge. In the 2026 climate, where humidity levels frequently exceed 85 percent, wet drywall becomes a breeding ground for microbial growth within 24 to 48 hours. Professional restoration focuses on both the structural integrity of your home and the health of your indoor environment.
Understanding the difference between simple cosmetic repair and full structural restoration is vital for homeowners in Arabi, Meraux, and Chalmette. This guide provides the technical steps necessary to handle water damaged drywall while adhering to current IICRC S500 standards for professional water damage restoration. If you are dealing with Category 3 water, such as a sewage backup, your approach must be much more aggressive than a clean water leak from a supply line. This level of care mirrors the standards used for emergency sewage cleanup in Metairie, where contamination risks are high.

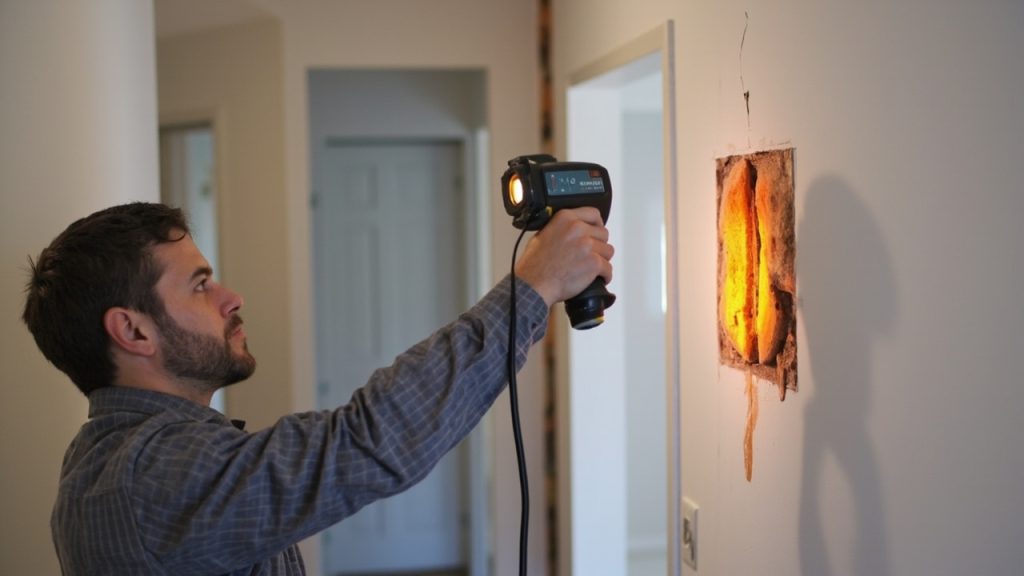
Initial Moisture Assessment and Thermal Imaging
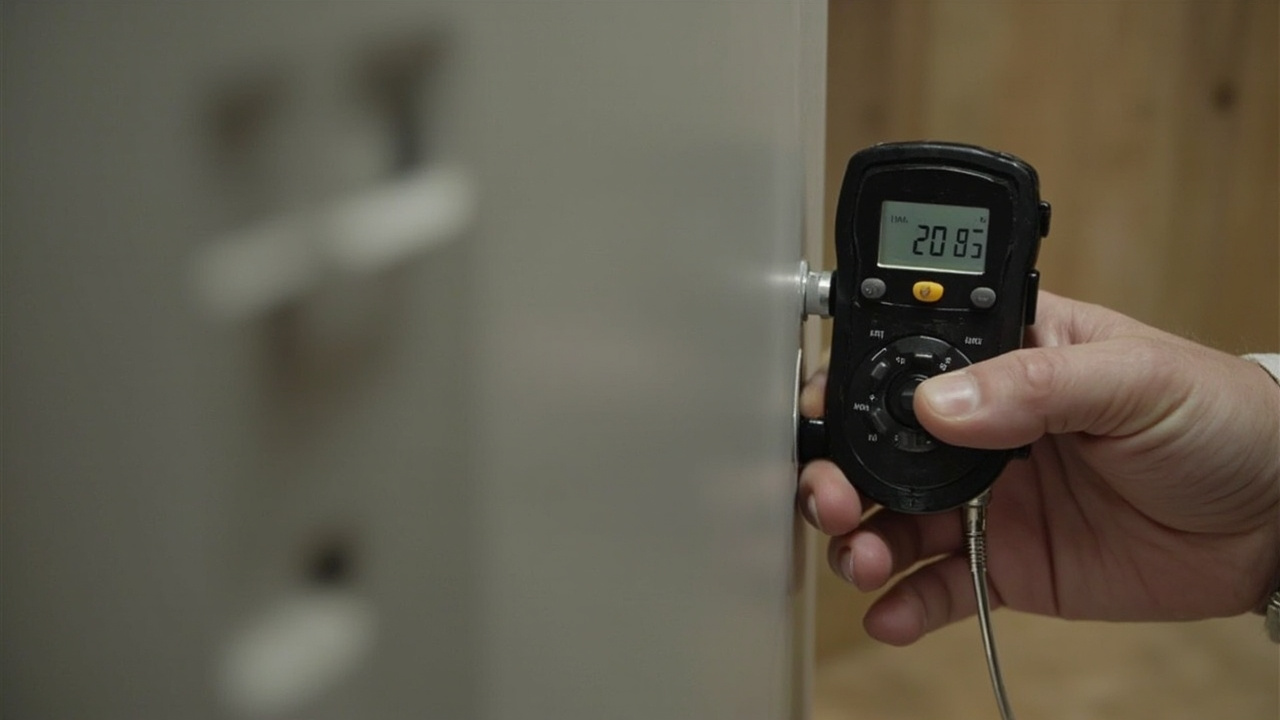
Before you remove a single piece of drywall, you must identify the full extent of the moisture migration. Water often travels further than the visible stain on the wall. Professional restorers in the New Orleans metro area use infrared cameras and penetrating moisture meters to create a moisture map. These tools allow us to see behind the paint to find trapped pockets of water that could cause rot in your wall studs.
In Chalmette, the high water table and local soil conditions mean that moisture can also wick up from the slab. You should check the moisture content of the baseplates and the insulation. If the insulation is fiberglass or cellulose and has become wet, it must be removed. Wet insulation loses its R-value and holds moisture against the wood framing, which leads to structural decay. This diagnostic phase is similar to the precision required for mold remediation in Garden District mansions, where hidden moisture can destroy historic building materials.
Determining the Flood Cut Height
The standard practice in 2026 for water damaged drywall is the flood cut. This involves removing a strip of drywall along the bottom of the wall to allow the wall cavity to breathe. If the water line reached two inches, we typically perform a two foot flood cut. If the water reached twelve inches, a four foot cut is necessary. This provides enough space to remove wet insulation and gives our LGR dehumidifiers access to the interior of the wall. We always cut to the center of the nearest stud to ensure the new drywall has a solid surface for attachment later.
Step One Demolition and Safe Removal
Start by turning off the electricity to the affected rooms at the breaker box. Use a utility knife or a drywall saw to follow your marked lines. In Chalmette homes built with older materials, you must be cautious of lead or asbestos, though current 2026 safety protocols assume a high standard of PPE for all projects. Wear an N95 or P100 respirator, gloves, and eye protection. Bag the wet debris immediately in 6 mil plastic bags to prevent the spread of mold spores throughout your home.
After the drywall is removed, you will likely see the wet wall studs and the floor plate. Use a HEPA vacuum to remove any remaining dust or debris from the wall cavity. This ensures that when we apply antimicrobial treatments, they make direct contact with the wood surfaces. This thorough cleaning process is a staple of black mold removal in Algiers and other high humidity areas of New Orleans.
| Factor | Drywall Condition | Action Required |
|---|---|---|
| Water Category | Category 1 (Clean) | Attempt to dry in place if caught early |
| Water Category | Category 2 or 3 (Gray/Black) | Immediate removal and disposal |
| Structural Integrity | Sagging or Softened | Full replacement |
| Microbial Growth | Visible Mold Present | Removal and antimicrobial treatment |
| Insulation Type | Wet Fiberglass/Cellulose | Mandatory removal |
Step Two Structural Drying and Dehumidification
Once the wet materials are gone, the focus shifts to psychrometry. This is the science of drying. In the current New Orleans environment, simply opening a window is counterproductive because the outdoor humidity is too high. We use Low Grain Refrigerant (LGR) dehumidifiers to pull moisture out of the air and the structural wood. We also position centrifugal air movers to create a high velocity vortex against the exposed studs.
You must monitor the Grains Per Pound (GPP) of the air. We aim to get the wood moisture content below 15 percent before we even think about hanging new drywall. If you seal up a wall while the studs are still at 20 percent moisture, you are essentially trapping a mold colony behind your new finish. This process is identical to the high speed drying needed for restoration for Lakeview homeowners who deal with frequent local flooding.

Step Three Antimicrobial Treatment and Sanitation
In St. Bernard Parish, the heat and moisture levels make antimicrobial treatments mandatory. We apply EPA-registered phenolics or botanical disinfectants to all exposed framing. This step prevents the growth of secondary mold and eliminates odors caused by bacteria in the floodwater. We pay special attention to the bottom plates where water tends to pool. This level of sanitation is particularly important for kitchen flood response in Uptown where food safety is a concern.
Step Four Hanging and Finishing New Drywall
After the wood is verified dry by a certified technician, you can begin the rebuild. Install new mold resistant drywall, often referred to as green board or purple board, especially in moisture prone areas like laundry rooms or bathrooms. Use galvanized or coated drywall screws to prevent rust in the humid Chalmette air. Ensure the new pieces are snug against the existing drywall for a seamless finish.
Applying the joint compound requires several coats. In the current 2026 market, many homeowners prefer a Level 5 finish which involves a skim coat over the entire surface to hide any imperfections from the patch. Sand between each coat using a vacuum-shrouded sander to keep dust out of your HVAC system. Once the mud is dry, apply a high quality primer designed to seal the porous surface of the new gypsum.
| Phase | Duration | Notes |
|---|---|---|
| Extraction and Demo | 1 Day | Dependent on room size and water volume |
| Structural Drying | 3 to 5 Days | LGR Dehumidifiers must run 24/7 |
| Sanitation | 1 Day | Includes dry time for antimicrobials |
| Hanging and Taping | 2 Days | Requires precise measurement for flood cuts |
| Mudding and Sanding | 3 Days | Each coat needs 24 hours to dry properly |
Step Five Painting and Final Inspection
The final step is matching your existing paint and texture. In many Chalmette homes, walls have a light orange peel or knockdown texture. You can use a hopper gun to replicate this look before applying the final color. We always recommend painting the entire wall from corner to corner rather than just the patch to ensure the color match is perfect under the 2026 LED lighting standards now common in local homes.
A final inspection should include one last moisture check to ensure no new issues have developed during the rebuild. We also check the operation of nearby electrical outlets and baseboard heaters that might have been affected by the initial water intrusion.
Managing Your St. Bernard Parish Insurance Claim
Documentation is the most important part of the insurance process in Chalmette. Most local policies require proof that the home was dried to industry standards before the rebuild started. We provide a full drying log, moisture maps, and infrared photos to your adjuster. This evidence proves that you took the necessary steps to mitigate further damage, which is a requirement in almost every homeowner policy in Louisiana.
When working with adjusters in St. Bernard Parish, it helps to reference the specific Louisiana State Licensing Board for Contractors regulations. Any residential restoration work over a certain dollar amount must be performed by a licensed professional to maintain your home’s warranty and resale value. We assist with the line item estimates using current 2026 pricing software to ensure you receive the full settlement required for a proper repair.
Frequently Asked Questions
Is it possible to just dry the drywall without cutting it?
In some cases involving clean water and very short exposure times, we can use specialized wall drying systems that inject air behind the wall. However, if the drywall has lost its structural integrity or the water was contaminated, removal is the only safe option.
How long does the whole process take?
A typical drywall restoration project in Chalmette takes about 10 to 14 days. This includes the drying time, which cannot be rushed. If you hang new drywall too early, you risk mold growth and having to start the entire process over again.
Will my insurance cover the cost of the flood cut?
Yes, if the water damage was caused by a covered peril such as a burst pipe or a sudden storm, the mitigation work including the flood cut is typically covered. We work directly with your insurance company to document the necessity of these actions.
Do I need a permit for drywall repair in Chalmette?
For minor repairs, a permit is usually not required. However, if the water damage involved structural changes or extensive electrical work, the St. Bernard Parish Government Complex may require a permit. We handle the permitting process for our clients when necessary.
What is the best way to prevent future mold after a leak?
The key is rapid response and professional dehumidification. Using a standard household fan is not enough to dry the wall studs. You need professional grade equipment that can lower the humidity in the room to levels where mold cannot survive. Regular maintenance of your HVAC system and checking for leaks around windows and doors also helps manage the moisture levels in your Chalmette home.
If you are facing water damage in your property, do not wait for the moisture to turn into a mold problem. Professional intervention ensures your home is restored correctly and safely. Contact a local expert who understands the unique challenges of the St. Bernard Parish climate to get your restoration started today.